![]()
 Visit MIT Deep Learning
 Run in Google Colab
 View Source on GitHub
Copyright Information
Laboratory 3: Reinforcement Learning
Reinforcement learning (RL) is a subset of machine learning which poses learning problems as interactions between agents and environments. It often assumes agents have no prior knowledge of a world, so they must learn to navigate environments by optimizing a reward function. Within an environment, an agent can take certain actions and receive feedback, in the form of positive or negative rewards, with respect to their decision. As such, an agent's feedback loop is somewhat akin to the idea of "trial and error", or the manner in which a child might learn to distinguish between "good" and "bad" actions.
In practical terms, our RL agent will interact with the environment by taking an action at each timestep, receiving a corresponding reward, and updating its state according to what it has "learned".

While the ultimate goal of reinforcement learning is to teach agents to act in the real, physical world, simulated environments -- like games and simulation engines -- provide a convenient proving ground for developing RL algorithms and agents.
In previous labs, we have explored both supervised (with LSTMs, CNNs) and unsupervised / semi-supervised (with VAEs) learning tasks. Reinforcement learning is fundamentally different, in that we are training a deep learning algorithm to govern the actions of our RL agent, that is trying, within its environment, to find the optimal way to achieve a goal. The goal of training an RL agent is to determine the best next step to take to earn the greatest final payoff or return. In this lab, we focus on building a reinforcement learning algorithm to master two different environments with varying complexity.
Cartpole: Balance a pole, protruding from a cart, in an upright position by only moving the base left or right. Environment with a low-dimensional observation space.
Driving in VISTA: Learn a driving control policy for an autonomous vehicle, end-to-end from raw pixel inputs and entirely in the data-driven simulation environment of VISTA. Environment with a high-dimensional observation space -- learning directly from raw pixels.
Let's get started! First we'll import TensorFlow, the course package, and some dependencies.
Before we dive in, let's take a step back and outline our approach, which is generally applicable to reinforcement learning problems in general:
Initialize our environment and our agent: here we will describe the different observations and actions the agent can make in the environemnt.
Define our agent's memory: this will enable the agent to remember its past actions, observations, and rewards.
Define a reward function: describes the reward associated with an action or sequence of actions.
Define the learning algorithm: this will be used to reinforce the agent's good behaviors and discourage bad behaviors.
Part 1: Cartpole
3.1 Define the Cartpole environment and agent
Environment
In order to model the environment for the Cartpole task, we'll be using a toolkit developed by OpenAI called OpenAI Gym. It provides several pre-defined environments for training and testing reinforcement learning agents, including those for classic physics control tasks, Atari video games, and robotic simulations. To access the Cartpole environment, we can use env = gym.make("CartPole-v0"), which we gained access to when we imported the gym package. We can instantiate different environments by passing the enivronment name to the make function.
One issue we might experience when developing RL algorithms is that many aspects of the learning process are inherently random: initializing game states, changes in the environment, and the agent's actions. As such, it can be helpful to set a initial "seed" for the environment to ensure some level of reproducibility. Much like you might use numpy.random.seed, we can call the comparable function in gym, seed, with our defined environment to ensure the environment's random variables are initialized the same each time.
In Cartpole, a pole is attached by an un-actuated joint to a cart, which moves along a frictionless track. The pole starts upright, and the goal is to prevent it from falling over. The system is controlled by applying a force of +1 or -1 to the cart. A reward of +1 is provided for every timestep that the pole remains upright. The episode ends when the pole is more than 15 degrees from vertical, or the cart moves more than 2.4 units from the center of the track. A visual summary of the cartpole environment is depicted below:

Given this setup for the environment and the objective of the game, we can think about: 1) what observations help define the environment's state; 2) what actions the agent can take.
First, let's consider the observation space. In this Cartpole environment our observations are:
Cart position
Cart velocity
Pole angle
Pole rotation rate
We can confirm the size of the space by querying the environment's observation space:
Second, we consider the action space. At every time step, the agent can move either right or left. Again we can confirm the size of the action space by querying the environment:
Cartpole agent
Now that we have instantiated the environment and understood the dimensionality of the observation and action spaces, we are ready to define our agent. In deep reinforcement learning, a deep neural network defines the agent. This network will take as input an observation of the environment and output the probability of taking each of the possible actions. Since Cartpole is defined by a low-dimensional observation space, a simple feed-forward neural network should work well for our agent. We will define this using the Sequential API.
Now that we have defined the core network architecture, we will define an action function that executes a forward pass through the network, given a set of observations, and samples from the output. This sampling from the output probabilities will be used to select the next action for the agent. We will also add support so that the choose_action function can handle either a single observation or a batch of observations.
Critically, this action function is totally general -- we will use this function for learning control algorithms for Cartpole, but it is applicable to other RL tasks, as well!
3.2 Define the agent's memory
Now that we have instantiated the environment and defined the agent network architecture and action function, we are ready to move on to the next step in our RL workflow:
Initialize our environment and our agent: here we will describe the different observations and actions the agent can make in the environemnt.
Define our agent's memory: this will enable the agent to remember its past actions, observations, and rewards.
Define the learning algorithm: this will be used to reinforce the agent's good behaviors and discourage bad behaviors.
In reinforcement learning, training occurs alongside the agent's acting in the environment; an episode refers to a sequence of actions that ends in some terminal state, such as the pole falling down or the cart crashing. The agent will need to remember all of its observations and actions, such that once an episode ends, it can learn to "reinforce" the good actions and punish the undesirable actions via training. Our first step is to define a simple Memory buffer that contains the agent's observations, actions, and received rewards from a given episode. We will also add support to combine a list of Memory objects into a single Memory. This will be very useful for batching, which will help you accelerate training later on in the lab.
Once again, note the modularity of this memory buffer -- it can and will be applied to other RL tasks as well!
3.3 Reward function
We're almost ready to begin the learning algorithm for our agent! The next step is to compute the rewards of our agent as it acts in the environment. Since we (and the agent) is uncertain about if and when the game or task will end (i.e., when the pole will fall), it is useful to emphasize getting rewards now rather than later in the future -- this is the idea of discounting. This is a similar concept to discounting money in the case of interest. Recall from lecture, we use reward discount to give more preference at getting rewards now rather than later in the future. The idea of discounting rewards is similar to discounting money in the case of interest.
To compute the expected cumulative reward, known as the return, at a given timestep in a learning episode, we sum the discounted rewards expected at that time step , within a learning episode, and projecting into the future. We define the return (cumulative reward) at a time step , as:
where is the discount factor and is the reward at time step , and the index increments projection into the future within a single learning episode. Intuitively, you can think of this function as depreciating any rewards received at later time steps, which will force the agent prioritize getting rewards now. Since we can't extend episodes to infinity, in practice the computation will be limited to the number of timesteps in an episode -- after that the reward is assumed to be zero.
Take note of the form of this sum -- we'll have to be clever about how we implement this function. Specifically, we'll need to initialize an array of zeros, with length of the number of time steps, and fill it with the real discounted reward values as we loop through the rewards from the episode, which will have been saved in the agents memory. What we ultimately care about is which actions are better relative to other actions taken in that episode -- so, we'll normalize our computed rewards, using the mean and standard deviation of the rewards across the learning episode.
We will use this definition of the reward function in both parts of the lab so make sure you have it executed!
3.4 Learning algorithm
Now we can start to define the learing algorithm which will be used to reinforce good behaviors of the agent and discourage bad behaviours. In this lab, we will focus on policy gradient methods which aim to maximize the likelihood of actions that result in large rewards. Equivalently, this means that we want to minimize the negative likelihood of these same actions. We achieve this by simply scaling the probabilities by their associated rewards -- effectively amplifying the likelihood of actions that resujlt in large rewards.
Since the log function is monotonically increasing, this means that minimizing negative likelihood is equivalent to minimizing negative log-likelihood. Recall that we can easily compute the negative log-likelihood of a discrete action by evaluting its softmax cross entropy. Like in supervised learning, we can use stochastic gradient descent methods to achieve the desired minimization.
Let's begin by defining the loss function.
Now let's use the loss function to define a training step of our learning algorithm. This is a very generalizable definition which we will use
3.5 Run cartpole!
Having had no prior knowledge of the environment, the agent will begin to learn how to balance the pole on the cart based only on the feedback received from the environment! Having defined how our agent can move, how it takes in new observations, and how it updates its state, we'll see how it gradually learns a policy of actions to optimize balancing the pole as long as possible. To do this, we'll track how the rewards evolve as a function of training -- how should the rewards change as training progresses?
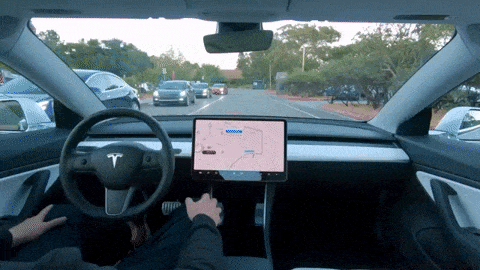
To get a sense of how our agent did, we can save a video of the trained model working on balancing the pole. Realize that this is a brand new environment that the agent has not seen before!
Let's display the saved video to watch how our agent did!
How does the agent perform? Could you train it for shorter amounts of time and still perform well? Do you think that training longer would help even more?
Part 2: Training Autonomous Driving Policies in VISTA
Autonomous control has traditionally be dominated by algorithms that explicitly decompose individual aspects of the control pipeline. For example, in autonomous driving, traditional methods work by first detecting road and lane boundaries, and then using path planning and rule-based methods to derive a control policy. Deep learning offers something very different -- the possibility of optimizing all these steps simultaneously, learning control end-to-end directly from raw sensory inputs.
You will explore the power of deep learning to learn autonomous control policies that are trained end-to-end, directly from raw sensory data, and entirely within a simulated world.
We will use the data-driven simulation engine VISTA, which uses techniques in computer vision to synthesize new photorealistic trajectories and driving viewpoints, that are still consistent with the world's appearance and fall within the envelope of a real driving scene. This is a powerful approach -- we can synthesize data that is photorealistic, grounded in the real world, and then use this data for training and testing autonomous vehicle control policies within this simulator.
In this part of the lab, you will use reinforcement lerning to build a self-driving agent with a neural network-based controller trained on RGB camera data. We will train the self-driving agent for the task of lane following. Beyond this data modality and control task, VISTA also supports different data modalities (such as LiDAR data) and different learning tasks (such as multi-car interactions).

You will put your agent to the test in the VISTA environment, and potentially, on board a full-scale autonomous vehicle! Specifically, as part of the MIT lab competitions, high-performing agents -- evaluated based on the maximum distance they can travel without crashing -- will have the opportunity to be put to the real test onboard a full-scale autonomous vehicle!!!
We start by installing dependencies. This includes installing the VISTA package itself.
VISTA provides some documentation which will be very helpful to completing this lab. You can always use the ?vista command to access the package documentation.
3.6 Create an environment in VISTA
Environments in VISTA are based on and built from human-collected driving traces. A trace is the data from a single driving run. In this case we'll be working with RGB camera data, from the viewpoint of the driver looking out at the road: the camera collects this data as the car drives around!
We will start by accessing a trace. We use that trace to instantiate an environment within VISTA. This is our World and defines the environment we will use for reinforcement learning. The trace itself helps to define a space for the environment; with VISTA, we can use the trace to generate new photorealistic viewpoints anywhere within that space. This provides valuable new training data as well as a robust testing environment.
The simulated environment of VISTA will serve as our training ground and testbed for reinforcement learning. We also define an Agent -- a car -- that will actually move around in the environmnet, and make and carry out actions in this world. Because this is an entirely simulated environment, our car agent will also be simulated!
If successful, you should see a blank black screen at this point. Your rendering display has been initialized.
3.7 Our virtual agent: the car
Our goal is to learn a control policy for our agent, our (hopefully) autonomous vehicle, end-to-end directly from RGB camera sensory input. As in Cartpole, we need to define how our virtual agent will interact with its environment.
Define agent's action functions
In the case of driving, the car agent can act -- taking a step in the VISTA environment -- according to a given control command. This amounts to moving with a desired speed and a desired curvature, which reflects the car's turn radius. Curvature has units . So, if a car is traversing a circle of radius meters, then it is turning with a curvature . The curvature is therefore correlated with the car's steering wheel angle, which actually controls its turn radius. Let's define the car agent's step function to capture the action of moving with a desired speed and desired curvature.
Inspect driving trajectories in VISTA
Recall that our VISTA environment is based off an initial human-collected driving trace. Also, we defined the agent's step function to defer to what the human executed if it is not provided with a desired speed and curvature with which to move.
Thus, we can further inspect our environment by using the step function for the driving agent to move through the environment by following the human path. The stepping and iteration will take about 1 iteration per second. We will then observe the data that comes out to see the agent's traversal of the environment.
Check out the simulated VISTA environment. What do you notice about the environment, the agent, and the setup of the simulation engine? How could these aspects useful for training models?
Define terminal states: crashing! (oh no)
Recall from Cartpole, our training episodes ended when the pole toppled, i.e., the agent crashed and failed. Similarly for training vehicle control policies in VISTA, we have to define what a crash means. We will define a crash as any time the car moves out of its lane or exceeds its maximum rotation. This will define the end of a training episode.
Quick check: acting with a random control policy
At this point, we have (1) an environment; (2) an agent, with a step function. Before we start learning a control policy for our vehicle agent, we start by testing out the behavior of the agent in the virtual world by providing it with a completely random control policy. Naturally we expect that the behavior will not be very robust! Let's take a look.
3.8 Preparing to learn a control policy: data preprocessing
So, hopefully you saw that the random control policy was, indeed, not very robust. Yikes. Our overall goal in this lab is to build a self-driving agent using a neural network controller trained entirely in the simulator VISTA. This means that the data used to train and test the self-driving agent will be supplied by VISTA. As a step towards this, we will do some data preprocessing to make it easier for the network to learn from these visual data.
Previously we rendered the data with a display as a quick check that the environment was working properly. For training the agent, we will directly access the car's observations, extract Regions Of Interest (ROI) from those observations, crop them out, and use these crops as training data for our self-driving agent controller. Observe both the full observation and the extracted ROI.
We will group these steps into some helper functions that we can use during training:
preprocess: takes a full observation as input and returns a preprocessed version. This can include whatever preprocessing steps you would like! For example, ROI extraction, cropping, augmentations, and so on. You are welcome to add and modify this function as you seek to optimize your self-driving agent!grab_and_preprocess: grab the car's current observation (i.e., image view from its perspective), and then call thepreprocessfunction on that observation.
3.9 Define the self-driving agent and learning algorithm
As before, we'll use a neural network to define our agent and output actions that it will take. Fixing the agent's driving speed, we will train this network to predict a curvature -- a continuous value -- that will relate to the car's turn radius. Specifically, define the model to output a prediction of a continuous distribution of curvature, defined by a mean and standard deviation . These parameters will define a Normal distribution over curvature.
What network architecture do you think would be especially well suited to the task of end-to-end control learning from RGB images? Since our observations are in the form of RGB images, we'll start with a convolutional network. Note that you will be tasked with completing a template CNN architecture for the self-driving car agent -- but you should certainly experiment beyond this template to try to optimize performance!
Now we will define the learing algorithm which will be used to reinforce good behaviors of the agent and discourage bad behaviours. As with Cartpole, we will use a policy gradient method that aims to maximize the likelihood of actions that result in large rewards. However, there are some key differences. In Cartpole, the agent's action space was discrete: it could only move left or right. In driving, the agent's action space is continuous: the control network is outputting a curvature, which is a continuous variable. We will define a probability distribution, defined by a mean and variance, over this continuous action space to define the possible actions the self-driving agent can take.
You will define three functions that reflect these changes and form the core of the the learning algorithm:
run_driving_model: takes an input image, and outputs a prediction of a continuous distribution of curvature. This will take the form of a Normal distribuion and will be defined using TensorFlow probability'stfp.distributions.Normalfunction, so the model's prediction will include both a mean and variance. Operates on an instancedriving_modeldefined above.compute_driving_loss: computes the loss for a prediction that is in the form of a continuous Normal distribution. Recall as in Cartpole, computing the loss involves multiplying the predicted log probabilities by the discounted rewards. Similar tocompute_lossin Cartpole.
The train_step function to use the loss function to execute a training step will be the same as we used in Cartpole! This will have to be executed abov in order for the driving agent to train properly.
3.10 Train the self-driving agent
We're now all set up to start training our RL algorithm and agent for autonomous driving!
We begin be initializing an opitimizer, environment, a new driving agent, and Memory buffer. This will be in the first code block. To restart training completely, you will need to re-run this cell to re-initiailize everything.
The second code block is the main training script. Here reinforcement learning episodes will be executed by agents in the VISTA environment. Since the self-driving agent starts out with literally zero knowledge of its environment, it can often take a long time to train and achieve stable behavior -- keep this in mind! For convenience, stopping and restarting the second cell will pick up training where you left off.
The training block will execute a policy in the environment until the agent crashes. When the agent crashes, the (state, action, reward) triplet (s,a,r) of the agent at the end of the episode will be saved into the Memory buffer, and then provided as input to the policy gradient loss function. This information will be used to execute optimization within the training step. Memory will be cleared, and we will then do it all over again!
Let's run the code block to train our self-driving agent. We will again visualize the evolution of the total reward as a function of training to get a sense of how the agent is learning. You should reach a reward of at least 100 to get bare minimum stable behavior.
3.11 Evaluate the self-driving agent
Finally we can put our trained self-driving agent to the test! It will execute autonomous control, in VISTA, based on the learned controller. We will evaluate how well it does based on this distance the car travels without crashing. We await the result...
Congratulations for making it to this point and for training an autonomous vehicle control policy using deep neural networks and reinforcement learning! Now, with an eye towards the lab competition, think about what you can change -- about the controller model, your data, your learning algorithm... -- to improve performance even further. Below in 3.11 we have some suggestions to get you started. We hope to see your self-driving control policy put to the real test!
3.11 Conclusion and submission information
That's it! Congratulations on training two RL agents and putting them to the test! We encourage you to consider the following:
How does each agent perform?
How does the complexity of the self-driving car agent compare to CartPole, and how does it alter the rate at which the agent learns and its performance?
What are some things you could change about the agent or the learning process to potentially improve performance?
Try to optimize your self-driving car model and algorithm to achieve improved performance. MIT students and affiliates will be eligible for prizes during the IAP offering. The prize for this lab includes an opportunity to test your model and algorithm onboard a full-scale autonomous vehicle in the real world.
To get you started, here are some suggested ways to improve your self-driving car model and/or RL algorithm:
different model architectures, for example recurrent models or Transformers with self-attention;
data augmentation and improved pre-processing;
different data modalities from different sensor types. VISTA also supports LiDAR and event-based camera data, with a new VISTA paper describing this. If you are interested in this, please contact Alexander Amini ([email protected])!
improved reinforcement learning algorithms, such as PPO, TRPO, or A3C;
different reward functions for reinforcemnt learning, for example penalizing the car's distance to the lane center rather than just whether or not it crashed;
Guided Policy Learning (GPL). Not reinforcement learning, but a powerful algorithm to leverage human data to provide additional supervision the learning task.
To enter the competition, MIT students and affiliates should upload the following to the course Canvas:
Jupyter notebook with the code you used to generate your results, with the self-driving car agent training fully executed;
saved video of your self-driving agent executing a trajectory in VISTA;
printout / recording of the maximum distance traveled by your agent before crashing;
text description and/or visual diagram of the architecture, settings, algorithm, hyperparameters, etc you used to generate your result -- if there are any additional or interesting modifications you made to the template code, please include these in your description;
finally, separate
.pyscript containing the code for your model, as well as a function call to load your model and the final trained weights. This will mean you will have to access and load the weights of your trained model in this script;
We will evaluate your entries based on the above components, as well as potential real-time evaluation of top candidates in new VISTA environments with snow / winter traces. The link for these traces is here. You are welcome to download this data and evaluate your models on it as well.
Good luck!