
Developer Guide
Welcome. We are so happy you've decided to contribute.
Setting up a development environment
The Panel library is a project that provides a wide range of data interfaces and an extensible set of plotting backends, which means the development and testing process involves a broad set of libraries.
This guide describes how to install and configure development environments.
If you have any problems with the steps here, please reach out in the dev channel on Discord or on Discourse.
Preliminaries
Basic understanding of how to contribute to Open Source
If this is your first open-source contribution, please study one or more of the below resources.
Contributing to Open-Source Projects as a New Python Developer | Video
How to Contribute to an Open Source Python Project | Blog post
Git
The Panel source code is stored in a Git source control repository. The first step to working on Panel is to install Git onto your system. There are different ways to do this, depending on whether you use Windows, Mac, or Linux.
To install Git on any platform, refer to the Installing Git section of the Pro Git Book.
To contribute to Panel, you will also need Github account and knowledge of the fork and pull request workflow.
Pixi
Developing all aspects of Panel requires a wide range of packages in different environments. To make this more manageable, Pixi manages the developer experience. To install Pixi, follow this guide.
:::{admonition} Note :class: info
You may want to update Pixi occasionally, especially when troubleshooting, to get the latest fixes and improvements:
:::
Glossary
Tasks: A task is what can be run with
pixi run <task-name>. Tasks can be anything from installing packages to running tests.Environments: An environment is a set of packages installed in a virtual environment. Each environment has a name; you can run tasks in a specific environment with the
-eflag. For example,pixi run -e test-core test-unitwill run thetest-unittask in thetest-coreenvironment.Lock-file: A lock-file is a file that contains all the information about the environments.
For more information, see the Pixi documentation.
:::{admonition} Note :class: info
The first time you run pixi, it will create a .pixi directory in the source directory. This directory will contain all the files needed for the virtual environments. The .pixi directory can be large, so it is advised not to put the source directory into a cloud-synced directory. :::
Installing the Project
Cloning the Project
The source code for the Panel project is hosted on GitHub. The first thing you need to do is clone the repository.
Go to github.com/holoviz/panel
Run in your terminal:
git clone https://github.com/<Your Username Here>/panel
The instructions for cloning above created a panel directory at your file system location. This panel directory is the source checkout for the remainder of this document, and your current working directory is this directory.
Fetch tags from upstream
The version number of the package depends on git tags, so you need to fetch the tags from the upstream repository:
Start developing
To start developing, run the following command, this will create an environment called default (in .pixi/envs), install Panel in editable mode, and install pre-commit git hooks:
:::{admonition} Note :class: info
The first time you run it, it will create a pixi.lock file with information for all available environments. This command will take a minute or so to run. :::
All available tasks can be found by running pixi task list, the following sections will give a brief introduction to the most common tasks.
:::{admonition} Note :class: info
If a pixi command fails to lock or install an environment, you can try to limit the number of concurrent solves and/or concurrent downloads, An example of this is:
:::
Editable install
It can be advantageous to install Panel in editable mode:
:::{admonition} Note :class: info
Currently, this needs to be run for each environment. So, if you want to install in the test-ui environment, you can add --environment / -e to the command:
You can find the list of environments in the pixi.toml file or via the command pixi info.
:::
Syncing Git tags with upstream repository
If you are working from a forked repository of Panel, you will need to sync the tags with the upstream repository. This is needed because the Panel version number depends on git tags. Syncing the git tags can be done with:
Developer Environment
The default environment is meant to provide all the tools needed to develop Panel.
This environment is created by running pixi run setup-dev. Run pixi shell to activate it; this is equivalent to source venv/bin/activate in a Python virtual environment or conda activate in a conda environment.
If you need to run a command directly instead of via pixi, activate the environment and run the command (e.g. pixi shell and pytest panel/tests/<somefile.py>).
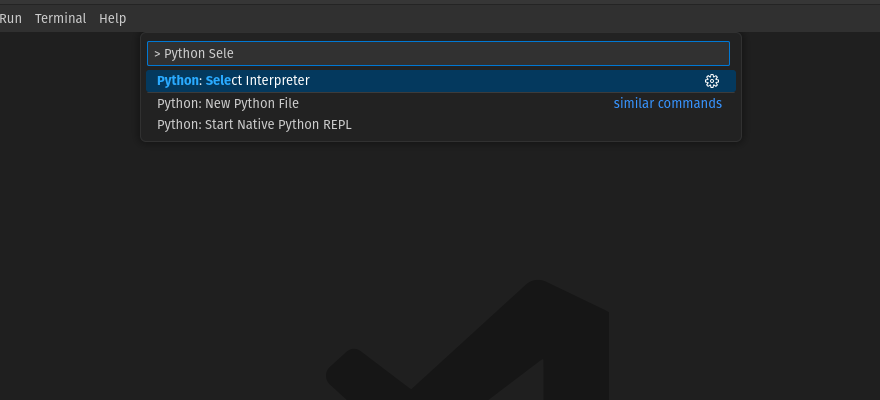
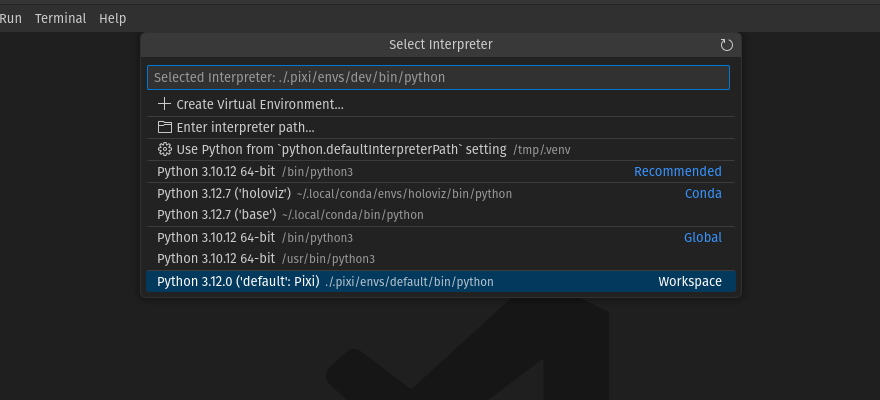
VS Code
This environment can also be selected in your IDE. In VS Code, this can be done by running the command Python: Select Interpreter and choosing {'default': Pixi}.
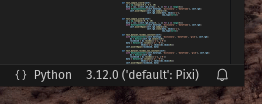
To confirm you are using this dev environment, check the bottom right corner:
Jupyter Lab
You can launch Jupyter lab with the default environment with pixi run lab. This can be advantageous when you need to edit the documentation or debug an example notebook.
Linting
Panel uses pre-commit to lint and format the source code. pre-commit is installed automatically when running pixi run setup-dev; it can also be installed with pixi run lint-install. pre-commit runs all the linters when a commit is made locally. Linting can be forced to run for all the files with:
:::{admonition} Note :class: info
Alternatively, if you have pre-commit installed elsewhere you can run:
:::
Testing
To help keep Panel maintainable, all Pull Requests (PR) with code changes should typically be accompanied by relevant tests. While exceptions may be made for specific circumstances, the default assumption should be that a Pull Request without tests will not be merged.
There are three types of tasks and five environments related to tests.
Unit tests
Unit tests are usually small tests executed with pytest. They can be found in panel/tests/. Unit tests can be run with the test-unit task:
The task is available in the following environments: test-310, test-311, test-312, and test-core. Where the first ones have the same environments except for different Python versions, and test-core only has a core set of dependencies.
If you haven't set the environment flag in the command, a menu will help you select which one of the environments to use.
Example tests
Panel's documentation consists mainly of Jupyter Notebooks. The example tests execute all the notebooks and fail if an error is raised. Example tests are possible thanks to nbval and can be found in the examples/ folder. Example tests can be run with the following command:
This task has the same environments as the unit tests except for test-core.
UI tests
Panel provides web components that users can interact with through the browser. UI tests allow checking that these components get displayed as expected and that the backend <-> front-end bi-communication works correctly. UI tests are possible thanks to Playwright. The test can be found in the panel/tests/ui/ folder. UI tests can be run with the following task. This task is only available in the test-ui environment. The first time you run it, it will download the necessary browser files to run the tests in the Chrome browser.
Documentation
The documentation can be built with the command:
As Panel uses notebooks for much of the documentation, this will take significant time to run (around an hour).
A development version of Panel can be found here. You can ask a maintainer if they want to make a dev release for your PR, but there is no guarantee they will say yes.
To be able to run cells interactively you need pyodide server, this can be run with:
Build
Panel has four build tasks, for building packages for Pip, Conda, Pyodide, and NPM.
Continuous Integration
Every push to the main branch or any PR branch on GitHub automatically triggers a test build with GitHub Actions.
You can see the list of all current and previous builds at this URL
Etiquette
GitHub Actions provides free build workers for open-source projects. A few considerations will help you be considerate of others needing these limited resources:
Run the tests locally before opening or pushing to an opened PR.
Group commits to meaningful chunks of work before pushing to GitHub (i.e., don't push on every commit).
Next Steps
You will likely want to check out the
Useful Links
Use this to explore new, not yet released features and docs
Use this to quickly explore and manually test the newest panel features in a fresh environment with all requirements installed.
Replace
mainwithname-of-other-branchorversionfor other branches.