Book a Demo!
CoCalc Logo Icon
StoreFeaturesDocsShareSupportNewsAboutPoliciesSign UpSign In
tensorflow
GitHub Repository: tensorflow/docs-l10n
Path: blob/master/site/ja/tutorials/load_data/video.ipynb
25118 views
Kernel: Python 3
#@title Licensed under the Apache License, Version 2.0 (the "License"); # you may not use this file except in compliance with the License. # You may obtain a copy of the License at # # https://www.apache.org/licenses/LICENSE-2.0 # # Unless required by applicable law or agreed to in writing, software # distributed under the License is distributed on an "AS IS" BASIS, # WITHOUT WARRANTIES OR CONDITIONS OF ANY KIND, either express or implied. # See the License for the specific language governing permissions and # limitations under the License.

動画データを読み込む

このチュートリアルでは、UCF101 人間行動データセットを使用して AVI 動画データを読み込んで前処理する方法を実演します。データを前処理すると、動画の分類/認識、キャプション、クラスタリングなどのタスクに使用できます。元のデータセットには、チェロの演奏、歯磨き、アイメイクなど、YouTube から収集された 101 のカテゴリのリアルなアクション動画が含まれています。このチュートリアルでは以下を見ていきます。

  • zip ファイルからデータを読み込む。

  • 動画ファイルから一連のフレームを読み取る。

  • 動画データを視覚化する。

  • フレームジェネレータ tf.data.Dataset をラップする。

この動画読み込みと前処理チュートリアルは、TensorFlow 動画チュートリアルシリーズの一部です。他に、以下の 3 つのチュートリアルがあります。

セットアップ

まず、ZIP ファイルの内容を検査するための remotezip、進捗バーを使用するための tqdm、動画ファイルを処理するための OpenCV、Jupyter ノートブックにデータを埋め込むための tensorflow_docs などの必要なライブラリをインストールしてインポートします。

# The way this tutorial uses the `TimeDistributed` layer requires TF>=2.10 !pip install -U "tensorflow>=2.10.0"
!pip install remotezip tqdm opencv-python !pip install -q git+https://github.com/tensorflow/docs
import tqdm import random import pathlib import itertools import collections import os import cv2 import numpy as np import remotezip as rz import tensorflow as tf # Some modules to display an animation using imageio. import imageio from IPython import display from urllib import request from tensorflow_docs.vis import embed

UCF101 データセットのサブセットをダウンロードする

UCF101 データセットには、101 カテゴリの動画内のさまざまなアクションが含まれており、主にアクション認識で使用されます。 このデモでは、これらのカテゴリのサブセットを使用します。

URL = 'https://storage.googleapis.com/thumos14_files/UCF101_videos.zip'

上記の URL には、UCF 101 データセットの zip ファイルが含まれています。remotezip ライブラリを使用してその URL の zip ファイルの内容を調べる関数を作成します。

def list_files_from_zip_url(zip_url): """ List the files in each class of the dataset given a URL with the zip file. Args: zip_url: A URL from which the files can be extracted from. Returns: List of files in each of the classes. """ files = [] with rz.RemoteZip(zip_url) as zip: for zip_info in zip.infolist(): files.append(zip_info.filename) return files
files = list_files_from_zip_url(URL) files = [f for f in files if f.endswith('.avi')] files[:10]

いくつかの動画とトレーニング用の限られた数のクラスから始めます。上記のコードブロックを実行した後、クラス名が各動画のファイル名に含まれていることに注意してください。

ファイル名からクラス名を取得する get_class 関数を定義します。次に、すべてのファイル(上記の files)のリストを各クラスのファイルをリストするディクショナリに変換する get_files_per_class という関数を作成します。

def get_class(fname): """ Retrieve the name of the class given a filename. Args: fname: Name of the file in the UCF101 dataset. Returns: Class that the file belongs to. """ return fname.split('_')[-3]
def get_files_per_class(files): """ Retrieve the files that belong to each class. Args: files: List of files in the dataset. Returns: Dictionary of class names (key) and files (values). """ files_for_class = collections.defaultdict(list) for fname in files: class_name = get_class(fname) files_for_class[class_name].append(fname) return files_for_class

クラスごとのファイルのリストを取得したら、データセットを作成するために、使用するクラスの数と、クラスごとに必要な動画の数を選択します。

NUM_CLASSES = 10 FILES_PER_CLASS = 50
files_for_class = get_files_per_class(files) classes = list(files_for_class.keys())
print('Num classes:', len(classes)) print('Num videos for class[0]:', len(files_for_class[classes[0]]))

データセット内に存在するクラスのサブセットと、クラスごとに特定の数のファイルを選択する select_subset_of_classes という新しい関数を作成します。

def select_subset_of_classes(files_for_class, classes, files_per_class): """ Create a dictionary with the class name and a subset of the files in that class. Args: files_for_class: Dictionary of class names (key) and files (values). classes: List of classes. files_per_class: Number of files per class of interest. Returns: Dictionary with class as key and list of specified number of video files in that class. """ files_subset = dict() for class_name in classes: class_files = files_for_class[class_name] files_subset[class_name] = class_files[:files_per_class] return files_subset
files_subset = select_subset_of_classes(files_for_class, classes[:NUM_CLASSES], FILES_PER_CLASS) list(files_subset.keys())

動画をトレーニングセット、検証セット、およびテストセットに分割するヘルパー関数を定義します。動画は zip ファイルを含む URL からダウンロードされ、それぞれのサブディレクトリに配置されます。

def download_from_zip(zip_url, to_dir, file_names): """ Download the contents of the zip file from the zip URL. Args: zip_url: A URL with a zip file containing data. to_dir: A directory to download data to. file_names: Names of files to download. """ with rz.RemoteZip(zip_url) as zip: for fn in tqdm.tqdm(file_names): class_name = get_class(fn) zip.extract(fn, str(to_dir / class_name)) unzipped_file = to_dir / class_name / fn fn = pathlib.Path(fn).parts[-1] output_file = to_dir / class_name / fn unzipped_file.rename(output_file)

次の関数は、まだデータのサブセットに配置されていない残りのデータを返します。残りのデータを次に指定されたデータのサブセットに配置します。

def split_class_lists(files_for_class, count): """ Returns the list of files belonging to a subset of data as well as the remainder of files that need to be downloaded. Args: files_for_class: Files belonging to a particular class of data. count: Number of files to download. Returns: Files belonging to the subset of data and dictionary of the remainder of files that need to be downloaded. """ split_files = [] remainder = {} for cls in files_for_class: split_files.extend(files_for_class[cls][:count]) remainder[cls] = files_for_class[cls][count:] return split_files, remainder

次の download_ucf_101_subset 関数を使用すると、UCF101 データセットのサブセットをダウンロードして、トレーニングセット、検証セット、テストセットに分割できます。使用するクラスの数を指定できます。splits 引数を使用すると、ディクショナリを渡すことができます。ディクショナリの主な値はサブセットの名前(例: 「トレーニング」)とクラスごとの動画の数です。

тdef download_ucf_101_subset(zip_url, num_classes, splits, download_dir): """ Download a subset of the UCF101 dataset and split them into various parts, such as training, validation, and test. Args: zip_url: A URL with a ZIP file with the data. num_classes: Number of labels. splits: Dictionary specifying the training, validation, test, etc. (key) division of data (value is number of files per split). download_dir: Directory to download data to. Return: Mapping of the directories containing the subsections of data. """ files = list_files_from_zip_url(zip_url) for f in files: path = os.path.normpath(f) tokens = path.split(os.sep) if len(tokens) <= 2: files.remove(f) # Remove that item from the list if it does not have a filename files_for_class = get_files_per_class(files) classes = list(files_for_class.keys())[:num_classes] for cls in classes: random.shuffle(files_for_class[cls]) # Only use the number of classes you want in the dictionary files_for_class = {x: files_for_class[x] for x in classes} dirs = {} for split_name, split_count in splits.items(): print(split_name, ":") split_dir = download_dir / split_name split_files, files_for_class = split_class_lists(files_for_class, split_count) download_from_zip(zip_url, split_dir, split_files) dirs[split_name] = split_dir return dirs
download_dir = pathlib.Path('./UCF101_subset/') subset_paths = download_ucf_101_subset(URL, num_classes = NUM_CLASSES, splits = {"train": 30, "val": 10, "test": 10}, download_dir = download_dir)

データをダウンロードすると、UCF101 データセットのサブセットのコピーが作成されます。次のコードを実行して、データのすべてのサブセットの中にある動画の総数を出力します。

video_count_train = len(list(download_dir.glob('train/*/*.avi'))) video_count_val = len(list(download_dir.glob('val/*/*.avi'))) video_count_test = len(list(download_dir.glob('test/*/*.avi'))) video_total = video_count_train + video_count_val + video_count_test print(f"Total videos: {video_total}")

また、データ ファイルのディレクトリをプレビューすることもできます。

!find ./UCF101_subset

各動画ファイルからフレームを作成する

frames_from_video_file 関数は、動画をフレームに分割し、動画ファイルからランダムに選択された n_frames のスパンを読み取り、それらを NumPy array として返します。メモリと計算のオーバーヘッドを削減するには、小さいフレーム数を選択してください。さらに、各動画から同じ数のフレームを選択すると、データのバッチ処理が容易になります。

def format_frames(frame, output_size): """ Pad and resize an image from a video. Args: frame: Image that needs to resized and padded. output_size: Pixel size of the output frame image. Return: Formatted frame with padding of specified output size. """ frame = tf.image.convert_image_dtype(frame, tf.float32) frame = tf.image.resize_with_pad(frame, *output_size) return frame
def frames_from_video_file(video_path, n_frames, output_size = (224,224), frame_step = 15): """ Creates frames from each video file present for each category. Args: video_path: File path to the video. n_frames: Number of frames to be created per video file. output_size: Pixel size of the output frame image. Return: An NumPy array of frames in the shape of (n_frames, height, width, channels). """ # Read each video frame by frame result = [] src = cv2.VideoCapture(str(video_path)) video_length = src.get(cv2.CAP_PROP_FRAME_COUNT) need_length = 1 + (n_frames - 1) * frame_step if need_length > video_length: start = 0 else: max_start = video_length - need_length start = random.randint(0, max_start + 1) src.set(cv2.CAP_PROP_POS_FRAMES, start) # ret is a boolean indicating whether read was successful, frame is the image itself ret, frame = src.read() result.append(format_frames(frame, output_size)) for _ in range(n_frames - 1): for _ in range(frame_step): ret, frame = src.read() if ret: frame = format_frames(frame, output_size) result.append(frame) else: result.append(np.zeros_like(result[0])) src.release() result = np.array(result)[..., [2, 1, 0]] return result

動画データを視覚化する

一連のフレームを NumPy 配列として返す frames_from_video_file 関数。Patrick Gillett による Wikimedia{:.external} の新しい動画でこの関数を使用してみてください。

!curl -O https://upload.wikimedia.org/wikipedia/commons/8/86/End_of_a_jam.ogv
video_path = "End_of_a_jam.ogv"
sample_video = frames_from_video_file(video_path, n_frames = 10) sample_video.shape
def to_gif(images): converted_images = np.clip(images * 255, 0, 255).astype(np.uint8) imageio.mimsave('./animation.gif', converted_images, fps=10) return embed.embed_file('./animation.gif')
to_gif(sample_video)

この動画を調べるだけでなく、UCF-101 データを表示することもできます。これを行うには、次のコードを実行します。

# docs-infra: no-execute ucf_sample_video = frames_from_video_file(next(subset_paths['train'].glob('*/*.avi')), 50) to_gif(ucf_sample_video)

次に、TensorFlow データパイプラインにデータをフィードするイテラブルオブジェクトを作成するために、FrameGenerator クラスを定義します。ジェネレーター (__call__)関数は、frames_from_video_file によって生成されたフレーム配列と、一連のフレームに関連付けられたラベルのワンホットエンコードされたベクトルを生成します。

class FrameGenerator: def __init__(self, path, n_frames, training = False): """ Returns a set of frames with their associated label. Args: path: Video file paths. n_frames: Number of frames. training: Boolean to determine if training dataset is being created. """ self.path = path self.n_frames = n_frames self.training = training self.class_names = sorted(set(p.name for p in self.path.iterdir() if p.is_dir())) self.class_ids_for_name = dict((name, idx) for idx, name in enumerate(self.class_names)) def get_files_and_class_names(self): video_paths = list(self.path.glob('*/*.avi')) classes = [p.parent.name for p in video_paths] return video_paths, classes def __call__(self): video_paths, classes = self.get_files_and_class_names() pairs = list(zip(video_paths, classes)) if self.training: random.shuffle(pairs) for path, name in pairs: video_frames = frames_from_video_file(path, self.n_frames) label = self.class_ids_for_name[name] # Encode labels yield video_frames, label

TensorFlow Dataset としてラップする前に FrameGenerator オブジェクトをテストします。またトレーニングデータセットについては、データがシャッフルされるように、トレーニングモードを必ず有効にしてください。

fg = FrameGenerator(subset_paths['train'], 10, training=True) frames, label = next(fg()) print(f"Shape: {frames.shape}") print(f"Label: {label}")

最後に、TensorFlow データ入力パイプラインを作成します。ジェネレーターオブジェクトから作成するこのパイプラインを使用すると、ディープラーニングモデルにデータをフィードできます。この動画パイプラインでは、各要素はフレームとそれに関連付けられたラベルの 1 つのセットです。

# Create the training set output_signature = (tf.TensorSpec(shape = (None, None, None, 3), dtype = tf.float32), tf.TensorSpec(shape = (), dtype = tf.int16)) train_ds = tf.data.Dataset.from_generator(FrameGenerator(subset_paths['train'], 10, training=True), output_signature = output_signature)

ラベルがシャッフルされてたことを確認します。

for frames, labels in train_ds.take(10): print(labels)
# Create the validation set val_ds = tf.data.Dataset.from_generator(FrameGenerator(subset_paths['val'], 10), output_signature = output_signature)
# Print the shapes of the data train_frames, train_labels = next(iter(train_ds)) print(f'Shape of training set of frames: {train_frames.shape}') print(f'Shape of training labels: {train_labels.shape}') val_frames, val_labels = next(iter(val_ds)) print(f'Shape of validation set of frames: {val_frames.shape}') print(f'Shape of validation labels: {val_labels.shape}')

データセットを構成してパフォーマンスを改善する

I/O がブロックされることなくディスクからデータを取得できるように、バッファ付きプリフェッチを使用します。以下の 2 つの関数は、データを読み込むときに使用する必要がある重要な方法です。

  • Dataset.cache は、最初のエポック中に画像をディスクから読み込んだ後、メモリに保持します。これにより、モデルのトレーニング中にデータセットがボトルネックになることを回避できます。データセットが大きすぎてメモリに収まらない場合は、この方法を使用して、パフォーマンスの高いオンディスクキャッシュを作成することもできます。

  • Dataset.prefetch は、トレーニング中にデータの前処理とモデルの実行をオーバーラップさせます。詳しくは、tf.data によるパフォーマンスの向上を参照してください。

AUTOTUNE = tf.data.AUTOTUNE train_ds = train_ds.cache().shuffle(1000).prefetch(buffer_size = AUTOTUNE) val_ds = val_ds.cache().shuffle(1000).prefetch(buffer_size = AUTOTUNE)

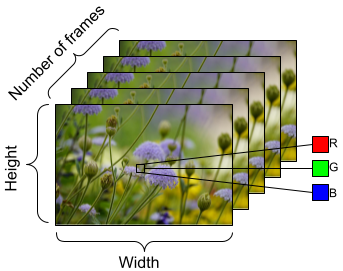
モデルにフィードするデータを準備するには、以下に示すようにバッチ処理を使用します。AVI ファイルなどの動画データを扱う場合、データを [batch_size, number_of_frames, height, width, channels] の5 次元オブジェクトの形状にする必要があることに注意してください。対照的に、画像には [batch_size, height, width, channels] の 4 つの次元があります。下の画像は、動画データの形状がどのように表現されるかを示したものです。

動画データ形状

train_ds = train_ds.batch(2) val_ds = val_ds.batch(2) train_frames, train_labels = next(iter(train_ds)) print(f'Shape of training set of frames: {train_frames.shape}') print(f'Shape of training labels: {train_labels.shape}') val_frames, val_labels = next(iter(val_ds)) print(f'Shape of validation set of frames: {val_frames.shape}') print(f'Shape of validation labels: {val_labels.shape}')

次のステップ

ここで作成したラベル付きの動画フレームの TensorFlow Dataset はディープラーニングモデルで使用できます。事前トレーニング済みの EfficientNet{:.external} を使用する次の分類モデルは、数分で高精度にトレーニングされます。

net = tf.keras.applications.EfficientNetB0(include_top = False) net.trainable = False model = tf.keras.Sequential([ tf.keras.layers.Rescaling(scale=255), tf.keras.layers.TimeDistributed(net), tf.keras.layers.Dense(10), tf.keras.layers.GlobalAveragePooling3D() ]) model.compile(optimizer = 'adam', loss=tf.keras.losses.SparseCategoricalCrossentropy(from_logits = True), metrics=['accuracy']) model.fit(train_ds, epochs = 10, validation_data = val_ds, callbacks = tf.keras.callbacks.EarlyStopping(patience = 2, monitor = 'val_loss'))

TensorFlow での動画の操作についての詳細は、以下のチュートリアルをご覧ください。