Book a Demo!
CoCalc Logo Icon
StoreFeaturesDocsShareSupportNewsAboutPoliciesSign UpSign In
tensorflow
GitHub Repository: tensorflow/docs-l10n
Path: blob/master/site/ko/tutorials/load_data/video.ipynb
25118 views
Kernel: Python 3
#@title Licensed under the Apache License, Version 2.0 (the "License"); # you may not use this file except in compliance with the License. # You may obtain a copy of the License at # # https://www.apache.org/licenses/LICENSE-2.0 # # Unless required by applicable law or agreed to in writing, software # distributed under the License is distributed on an "AS IS" BASIS, # WITHOUT WARRANTIES OR CONDITIONS OF ANY KIND, either express or implied. # See the License for the specific language governing permissions and # limitations under the License.

비디오 데이터 로드

이 튜토리얼은 UCF101 인간 행동 데이터세트를 사용하여 AVI 비디오 데이터를 로드하고 전처리하는 방법을 보여줍니다. 데이터를 전처리하면 비디오 분류/인식, 캡션 또는 클러스터링과 같은 작업에 사용할 수 있습니다. 원본 데이터세트에는 첼로 연주, 양치질, 눈 화장 등 101개 범주로 YouTube에서 수집한 사실적인 동작 비디오가 포함되어 있습니다. 다음을 수행하는 방법을 배우게 됩니다.

  • zip 파일에서 데이터를 로드합니다.

  • 비디오 파일에서 프레임 시퀀스를 읽습니다.

  • 비디오 데이터를 시각화합니다.

  • 프레임 생성기 tf.data.Dataset을 래핑합니다.

이 비디오 로드 및 전처리 튜토리얼은 TensorFlow 비디오 튜토리얼 시리즈의 첫 번째 부분입니다. 다른 세 개의 튜토리얼은 다음과 같습니다.

설정

ZIP 파일의 내용을 검사하기 위한 remotezip, 진행률 표시줄을 사용하기 위한 tqdm, 비디오 파일을 처리하기 위한 OpenCV, Jupyter 노트북에 데이터를 삽입하기 위한 tensorflow_docs를 포함하여 몇 가지 필요한 라이브러리를 설치하고 가져오는 것으로 시작합니다.

# The way this tutorial uses the `TimeDistributed` layer requires TF>=2.10 !pip install -U "tensorflow>=2.10.0"
!pip install remotezip tqdm opencv-python !pip install -q git+https://github.com/tensorflow/docs
import tqdm import random import pathlib import itertools import collections import os import cv2 import numpy as np import remotezip as rz import tensorflow as tf # Some modules to display an animation using imageio. import imageio from IPython import display from urllib import request from tensorflow_docs.vis import embed

UCF101 데이터세트의 하위 집합 다운로드

UCF101 데이터세트에는 주로 동작 인식에 사용되는 비디오의 다양한 동작이 101개의 범주로 포함되어 있습니다. 이 데모에서 이러한 범주 중 일부를 사용합니다.

URL = 'https://storage.googleapis.com/thumos14_files/UCF101_videos.zip'

위 URL에는 UCF 101 데이터세트가 포함된 zip 파일이 포함되어 있습니다. remotezip 라이브러리를 사용하여 해당 URL에 있는 zip 파일의 내용을 검사하는 함수를 만듭니다.

def list_files_from_zip_url(zip_url): """ List the files in each class of the dataset given a URL with the zip file. Args: zip_url: A URL from which the files can be extracted from. Returns: List of files in each of the classes. """ files = [] with rz.RemoteZip(zip_url) as zip: for zip_info in zip.infolist(): files.append(zip_info.filename) return files
files = list_files_from_zip_url(URL) files = [f for f in files if f.endswith('.avi')] files[:10]

몇 개의 비디오와 제한된 수의 훈련용 클래스로 시작합니다. 위의 코드 블록을 실행한 후 각 비디오의 파일 이름에 클래스 이름이 포함되어 있음을 확인하세요.

파일 이름에서 클래스 이름을 검색하는 get_class 함수를 정의합니다. 그런 다음 모든 파일(위의 files) 목록을 각 클래스에 대한 파일을 나열하는 사전으로 변환하는 get_files_per_class라는 함수를 만듭니다.

def get_class(fname): """ Retrieve the name of the class given a filename. Args: fname: Name of the file in the UCF101 dataset. Returns: Class that the file belongs to. """ return fname.split('_')[-3]
def get_files_per_class(files): """ Retrieve the files that belong to each class. Args: files: List of files in the dataset. Returns: Dictionary of class names (key) and files (values). """ files_for_class = collections.defaultdict(list) for fname in files: class_name = get_class(fname) files_for_class[class_name].append(fname) return files_for_class

클래스별 파일 목록이 준비되면 데이터세트를 만들기 위해 사용할 클래스 수와 클래스당 원하는 비디오 수를 선택할 수 있습니다.

NUM_CLASSES = 10 FILES_PER_CLASS = 50
files_for_class = get_files_per_class(files) classes = list(files_for_class.keys())
print('Num classes:', len(classes)) print('Num videos for class[0]:', len(files_for_class[classes[0]]))

데이터세트 내에 있는 클래스의 하위 집합과 클래스당 특정 수의 파일을 선택하는 select_subset_of_classes라는 새 함수를 만듭니다.

def select_subset_of_classes(files_for_class, classes, files_per_class): """ Create a dictionary with the class name and a subset of the files in that class. Args: files_for_class: Dictionary of class names (key) and files (values). classes: List of classes. files_per_class: Number of files per class of interest. Returns: Dictionary with class as key and list of specified number of video files in that class. """ files_subset = dict() for class_name in classes: class_files = files_for_class[class_name] files_subset[class_name] = class_files[:files_per_class] return files_subset
files_subset = select_subset_of_classes(files_for_class, classes[:NUM_CLASSES], FILES_PER_CLASS) list(files_subset.keys())

비디오를 훈련, 검증 및 테스트 세트로 분할하는 헬퍼 함수를 정의합니다. 비디오는 zip 파일로 URL에서 다운로드되어 각각의 하위 디렉터리에 배치됩니다.

def download_from_zip(zip_url, to_dir, file_names): """ Download the contents of the zip file from the zip URL. Args: zip_url: A URL with a zip file containing data. to_dir: A directory to download data to. file_names: Names of files to download. """ with rz.RemoteZip(zip_url) as zip: for fn in tqdm.tqdm(file_names): class_name = get_class(fn) zip.extract(fn, str(to_dir / class_name)) unzipped_file = to_dir / class_name / fn fn = pathlib.Path(fn).parts[-1] output_file = to_dir / class_name / fn unzipped_file.rename(output_file)

다음 함수는 데이터의 하위 집합에 아직 배치되지 않은 나머지 데이터를 반환합니다. 이 나머지 데이터를 지정된 다음 데이터 하위 집합에 배치할 수 있습니다.

def split_class_lists(files_for_class, count): """ Returns the list of files belonging to a subset of data as well as the remainder of files that need to be downloaded. Args: files_for_class: Files belonging to a particular class of data. count: Number of files to download. Returns: Files belonging to the subset of data and dictionary of the remainder of files that need to be downloaded. """ split_files = [] remainder = {} for cls in files_for_class: split_files.extend(files_for_class[cls][:count]) remainder[cls] = files_for_class[cls][count:] return split_files, remainder

다음 download_ucf_101_subset 함수를 사용하면 UCF101 데이터세트의 하위 집합을 다운로드하고 훈련, 검증 및 테스트 세트로 분할할 수 있습니다. 사용하려는 클래스 수를 지정할 수 있습니다. splits 인수를 사용하면 키 값이 하위 집합의 이름(예: "train")과 클래스당 가지려는 비디오 수인 사전을 전달할 수 있습니다.

def download_ucf_101_subset(zip_url, num_classes, splits, download_dir): """ Download a subset of the UCF101 dataset and split them into various parts, such as training, validation, and test. Args: zip_url: A URL with a ZIP file with the data. num_classes: Number of labels. splits: Dictionary specifying the training, validation, test, etc. (key) division of data (value is number of files per split). download_dir: Directory to download data to. Return: Mapping of the directories containing the subsections of data. """ files = list_files_from_zip_url(zip_url) for f in files: path = os.path.normpath(f) tokens = path.split(os.sep) if len(tokens) <= 2: files.remove(f) # Remove that item from the list if it does not have a filename files_for_class = get_files_per_class(files) classes = list(files_for_class.keys())[:num_classes] for cls in classes: random.shuffle(files_for_class[cls]) # Only use the number of classes you want in the dictionary files_for_class = {x: files_for_class[x] for x in classes} dirs = {} for split_name, split_count in splits.items(): print(split_name, ":") split_dir = download_dir / split_name split_files, files_for_class = split_class_lists(files_for_class, split_count) download_from_zip(zip_url, split_dir, split_files) dirs[split_name] = split_dir return dirs
download_dir = pathlib.Path('./UCF101_subset/') subset_paths = download_ucf_101_subset(URL, num_classes = NUM_CLASSES, splits = {"train": 30, "val": 10, "test": 10}, download_dir = download_dir)

데이터를 다운로드한 후에는 이제 UCF101 데이터세트의 하위 집합 복사본이 있어야 합니다. 다음 코드를 실행하여 모든 데이터 하위 집합 사이에 가지고 있는 총 비디오 수를 인쇄합니다.

video_count_train = len(list(download_dir.glob('train/*/*.avi'))) video_count_val = len(list(download_dir.glob('val/*/*.avi'))) video_count_test = len(list(download_dir.glob('test/*/*.avi'))) video_total = video_count_train + video_count_val + video_count_test print(f"Total videos: {video_total}")

이제 데이터 파일의 디렉터리를 미리 볼 수도 있습니다.

!find ./UCF101_subset

각 비디오 파일에서 프레임 만들기

frames_from_video_file 함수는 비디오를 여러 프레임으로 분할하고 비디오 파일에서 무작위로 선택된 n_frames 범위를 읽은 다음, NumPy array로 반환합니다. 메모리와 계산 오버헤드를 줄이려면 적은 수의 프레임을 선택합니다. 또한 각 비디오에서 동일한 수의 프레임을 선택하면 데이터 배치 작업을 더 쉽게 수행할 수 있습니다.

def format_frames(frame, output_size): """ Pad and resize an image from a video. Args: frame: Image that needs to resized and padded. output_size: Pixel size of the output frame image. Return: Formatted frame with padding of specified output size. """ frame = tf.image.convert_image_dtype(frame, tf.float32) frame = tf.image.resize_with_pad(frame, *output_size) return frame
def frames_from_video_file(video_path, n_frames, output_size = (224,224), frame_step = 15): """ Creates frames from each video file present for each category. Args: video_path: File path to the video. n_frames: Number of frames to be created per video file. output_size: Pixel size of the output frame image. Return: An NumPy array of frames in the shape of (n_frames, height, width, channels). """ # Read each video frame by frame result = [] src = cv2.VideoCapture(str(video_path)) video_length = src.get(cv2.CAP_PROP_FRAME_COUNT) need_length = 1 + (n_frames - 1) * frame_step if need_length > video_length: start = 0 else: max_start = video_length - need_length start = random.randint(0, max_start + 1) src.set(cv2.CAP_PROP_POS_FRAMES, start) # ret is a boolean indicating whether read was successful, frame is the image itself ret, frame = src.read() result.append(format_frames(frame, output_size)) for _ in range(n_frames - 1): for _ in range(frame_step): ret, frame = src.read() if ret: frame = format_frames(frame, output_size) result.append(frame) else: result.append(np.zeros_like(result[0])) src.release() result = np.array(result)[..., [2, 1, 0]] return result

비디오 데이터 시각화하기

프레임 세트를 NumPy 배열로 반환하는 frames_from_video_file 함수입니다. Patrick Gillett가 Wikimedia{:.external}에 올린 새 동영상에서 이 기능을 사용해 보세요.

!curl -O https://upload.wikimedia.org/wikipedia/commons/8/86/End_of_a_jam.ogv
video_path = "End_of_a_jam.ogv"
sample_video = frames_from_video_file(video_path, n_frames = 10) sample_video.shape
def to_gif(images): converted_images = np.clip(images * 255, 0, 255).astype(np.uint8) imageio.mimsave('./animation.gif', converted_images, fps=10) return embed.embed_file('./animation.gif')
to_gif(sample_video)

이 비디오를 검토하는 외에 UCF-101 데이터를 표시할 수도 있습니다. 이렇게 하려면 다음 코드를 실행합니다.

# docs-infra: no-execute ucf_sample_video = frames_from_video_file(next(subset_paths['train'].glob('*/*.avi')), 50) to_gif(ucf_sample_video)

다음으로, TensorFlow 데이터 파이프라인에 데이터를 공급할 수 있는 반복 가능한 객체를 생성하기 위해 FrameGenerator 클래스를 정의합니다. 생성기(__call__) 함수는 frames_from_video_file에 의해 생성된 프레임 배열과 프레임 세트와 연관된 레이블의 원-핫 인코딩된 벡터를 생성합니다.

class FrameGenerator: def __init__(self, path, n_frames, training = False): """ Returns a set of frames with their associated label. Args: path: Video file paths. n_frames: Number of frames. training: Boolean to determine if training dataset is being created. """ self.path = path self.n_frames = n_frames self.training = training self.class_names = sorted(set(p.name for p in self.path.iterdir() if p.is_dir())) self.class_ids_for_name = dict((name, idx) for idx, name in enumerate(self.class_names)) def get_files_and_class_names(self): video_paths = list(self.path.glob('*/*.avi')) classes = [p.parent.name for p in video_paths] return video_paths, classes def __call__(self): video_paths, classes = self.get_files_and_class_names() pairs = list(zip(video_paths, classes)) if self.training: random.shuffle(pairs) for path, name in pairs: video_frames = frames_from_video_file(path, self.n_frames) label = self.class_ids_for_name[name] # Encode labels yield video_frames, label

TensorFlow Dataset 객체로 래핑하기 전에 FrameGenerator 객체를 테스트합니다. 또한 훈련 데이터세트의 경우 데이터가 섞이도록 훈련 모드를 활성화해야 합니다.

fg = FrameGenerator(subset_paths['train'], 10, training=True) frames, label = next(fg()) print(f"Shape: {frames.shape}") print(f"Label: {label}")

마지막으로, TensorFlow 데이터 입력 파이프라인을 만듭니다. 생성기 객체에서 생성하는 이 파이프라인을 사용하면 딥 러닝 모델에 데이터를 공급할 수 있습니다. 이 비디오 파이프라인에서 각 요소는 단일 프레임 세트 및 관련 레이블입니다.

# Create the training set output_signature = (tf.TensorSpec(shape = (None, None, None, 3), dtype = tf.float32), tf.TensorSpec(shape = (), dtype = tf.int16)) train_ds = tf.data.Dataset.from_generator(FrameGenerator(subset_paths['train'], 10, training=True), output_signature = output_signature)

레이블이 섞였는지 확인합니다.

for frames, labels in train_ds.take(10): print(labels)
# Create the validation set val_ds = tf.data.Dataset.from_generator(FrameGenerator(subset_paths['val'], 10), output_signature = output_signature)
# Print the shapes of the data train_frames, train_labels = next(iter(train_ds)) print(f'Shape of training set of frames: {train_frames.shape}') print(f'Shape of training labels: {train_labels.shape}') val_frames, val_labels = next(iter(val_ds)) print(f'Shape of validation set of frames: {val_frames.shape}') print(f'Shape of validation labels: {val_labels.shape}')

성능을 높이도록 데이터세트 구성하기

I/O가 차단되지 않고 디스크에서 데이터를 생성할 수 있도록 버퍼링된 프리페치를 사용합니다. 데이터를 로드하는 동안 사용해야 하는 두 가지 중요한 함수는 다음과 같습니다.

  • Dataset.cache: 첫 번째 epoch 동안 디스크에서 로드된 후 프레임 세트를 메모리에 유지합니다. 이 함수는 모델을 훈련하는 동안 데이터세트가 병목을 일으키지 않도록 합니다. 데이터세트가 너무 커서 메모리에 맞지 않는 경우 이 방법을 사용하여 고성능 디스크 캐시를 생성할 수도 있습니다.

  • Dataset.prefetch: 훈련하는 동안 데이터 전처리와 모델 실행을 중첩시킵니다. 자세한 내용은 tf.data로 성능 향상을 참조하세요.

AUTOTUNE = tf.data.AUTOTUNE train_ds = train_ds.cache().shuffle(1000).prefetch(buffer_size = AUTOTUNE) val_ds = val_ds.cache().shuffle(1000).prefetch(buffer_size = AUTOTUNE)

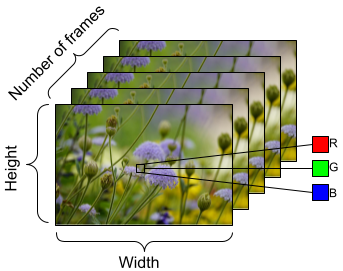
모델에 공급할 데이터를 준비하려면 아래와 같이 배치 처리를 사용합니다. AVI 파일과 같은 비디오 데이터로 작업할 때 데이터는 5차원 객체로 형성되어야 합니다. 이러한 차원은 [batch_size, number_of_frames, height, width, channels]와 같습니다. 이에 비해 이미지에는 [batch_size, height, width, channels] 4가지 차원이 있습니다. 아래 이미지는 비디오 데이터의 형태가 표현되는 방식을 보여주는 그림입니다.

비디오 데이터 형태

train_ds = train_ds.batch(2) val_ds = val_ds.batch(2) train_frames, train_labels = next(iter(train_ds)) print(f'Shape of training set of frames: {train_frames.shape}') print(f'Shape of training labels: {train_labels.shape}') val_frames, val_labels = next(iter(val_ds)) print(f'Shape of validation set of frames: {val_frames.shape}') print(f'Shape of validation labels: {val_labels.shape}')

다음 단계

레이블이 있는 비디오 프레임의 TensorFlow Dataset을 만들었으므로 이제 딥 러닝 모델에 이를 사용할 수 있습니다. 사전 훈련된 EfficientNet{:.external}을 사용하는 다음 분류 모델은 몇 분 안에 높은 정확도로 훈련됩니다.

net = tf.keras.applications.EfficientNetB0(include_top = False) net.trainable = False model = tf.keras.Sequential([ tf.keras.layers.Rescaling(scale=255), tf.keras.layers.TimeDistributed(net), tf.keras.layers.Dense(10), tf.keras.layers.GlobalAveragePooling3D() ]) model.compile(optimizer = 'adam', loss=tf.keras.losses.SparseCategoricalCrossentropy(from_logits = True), metrics=['accuracy']) model.fit(train_ds, epochs = 10, validation_data = val_ds, callbacks = tf.keras.callbacks.EarlyStopping(patience = 2, monitor = 'val_loss'))

TensorFlow에서 비디오 데이터 작업에 대해 자세히 알아보려면 다음 튜토리얼을 확인하세요.