Book a Demo!
CoCalc Logo Icon
StoreFeaturesDocsShareSupportNewsAboutPoliciesSign UpSign In
tensorflow
GitHub Repository: tensorflow/docs-l10n
Path: blob/master/site/zh-cn/guide/intro_to_graphs.ipynb
25115 views
Kernel: Python 3
#@title Licensed under the Apache License, Version 2.0 (the "License"); # you may not use this file except in compliance with the License. # You may obtain a copy of the License at # # https://www.apache.org/licenses/LICENSE-2.0 # # Unless required by applicable law or agreed to in writing, software # distributed under the License is distributed on an "AS IS" BASIS, # WITHOUT WARRANTIES OR CONDITIONS OF ANY KIND, either express or implied. # See the License for the specific language governing permissions and # limitations under the License.

计算图和 tf.function 简介

概述

本指南深入探究 TensorFlow 和 Keras 以演示 TensorFlow 的工作原理。如果您想立即开始使用 Keras,请查看 Keras 指南合集

在本指南中,您将了解 TensorFlow 如何让您对代码进行简单的更改来获取计算图、计算图的存储和表示方式以及如何使用它们来加速您的模型。

注:对于那些只熟悉 TensorFlow 1.x 的用户来说,本指南演示了迥然不同的计算图视图。

**这是一个整体概述,涵盖了 tf.function 如何让您从 Eager Execution 切换到计算图执行。**有关 tf.function 的更完整规范,请转到使用 tf.function 提高性能指南。

什么是计算图?

在前三篇指南中,您以 Eager 模式运行了 TensorFlow。这意味着 TensorFlow 运算由 Python 逐个执行,然后将结果返回给 Python。

虽然 Eager Execution 具有多个独特的优势,但计算图执行在 Python 外部实现了可移植性,并且往往提供更出色的性能。计算图执行意味着张量计算作为 TensorFlow 计算图执行,后者有时被称为 tf.Graph 或简称为“计算图”。

**计算图是包含一组 tf.Operation 对象(表示计算单元)和 tf.Tensor 对象(表示在运算之间流动的数据单元)的数据结构。**计算图在 tf.Graph 上下文中定义。由于这些计算图是数据结构,无需原始 Python 代码即可保存、运行和恢复它们。

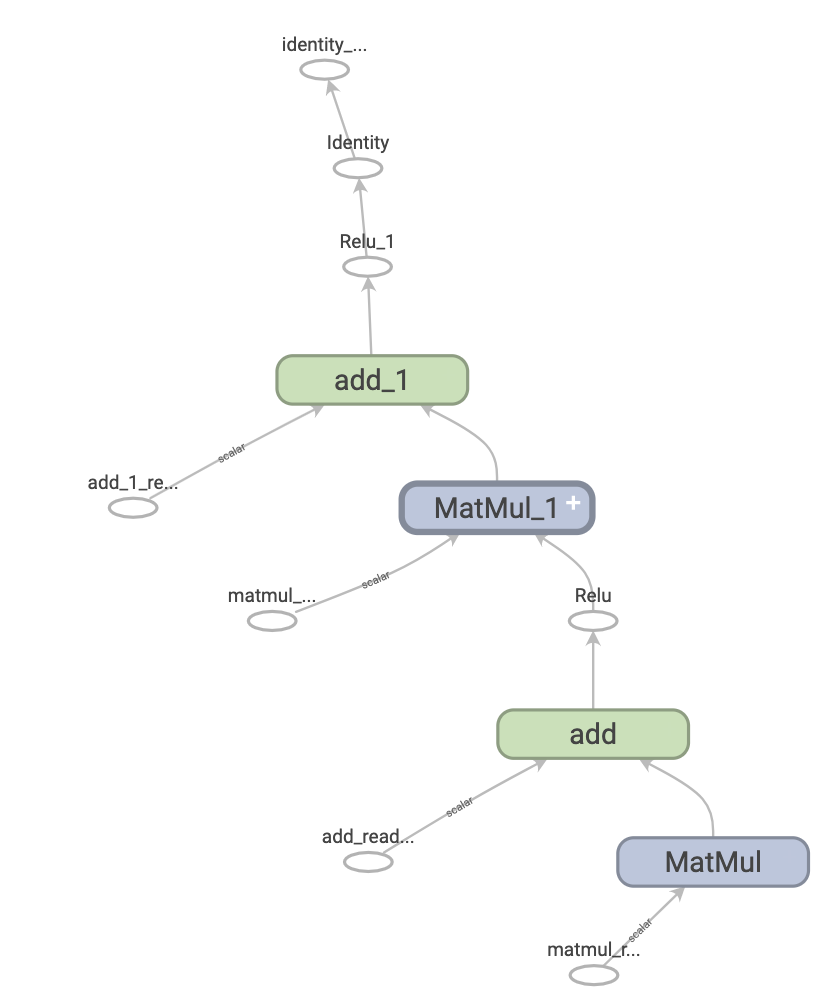
下面是一个表示两层神经网络的 TensorFlow 计算图在 TensorBoard 中呈现后的样子:

一个简单的 TensorFlow 计算图

计算图的优点

使用计算图,您将拥有极大的灵活性。您可以在移动应用、嵌入式设备和后端服务器等没有 Python 解释器的环境中使用 TensorFlow 计算图。当 TensorFlow 从 Python 导出计算图时,它会将这些计算图用作已保存模型的格式。

计算图的优化也十分轻松,允许编译器进行如下转换:

  • 通过在计算中折叠常量节点来静态推断张量的值*(“常量折叠”)*。

  • 分离独立的计算子部分,并在线程或设备之间进行拆分。

  • 通过消除通用子表达式来简化算术运算。

有一个完整的优化系统 Grappler 来执行这种加速和其他加速。

简而言之,计算图极为有用,它可以使 TensorFlow 快速运行、并行运行以及在多个设备上高效运行。

但是,为了方便起见,您仍然需要在 Python 中定义我们的机器学习模型(或其他计算),然后在需要时自动构造计算图。

安装

导入一些所需的库:

import tensorflow as tf import timeit from datetime import datetime

利用计算图

您可以使用 tf.function 在 TensorFlow 中创建和运行计算图,要么作为直接调用,要么作为装饰器。tf.function 将一个常规函数作为输入并返回一个 FunctionFunction 是一个 Python 可调用对象,它通过 Python 函数构建 TensorFlow 计算图。您可以按照与其 Python 等价函数相同的方式使用 Function

# Define a Python function. def a_regular_function(x, y, b): x = tf.matmul(x, y) x = x + b return x # `a_function_that_uses_a_graph` is a TensorFlow `Function`. a_function_that_uses_a_graph = tf.function(a_regular_function) # Make some tensors. x1 = tf.constant([[1.0, 2.0]]) y1 = tf.constant([[2.0], [3.0]]) b1 = tf.constant(4.0) orig_value = a_regular_function(x1, y1, b1).numpy() # Call a `Function` like a Python function. tf_function_value = a_function_that_uses_a_graph(x1, y1, b1).numpy() assert(orig_value == tf_function_value)

在外部,一个 Function 看起来就像您使用 TensorFlow 运算编写的常规函数​​。然而,在底层,它迥然不同。一个 Function 在一个 API 后面封装了多个 tf.Graph(在多态性部分了解详情)。这就是 Function 能够为您提供计算图执行的好处(例如速度和可部署性,请参阅上面的计算图的优点)。

tf.function 适用于一个函数及其调用的所有其他函数

def inner_function(x, y, b): x = tf.matmul(x, y) x = x + b return x # Use the decorator to make `outer_function` a `Function`. @tf.function def outer_function(x): y = tf.constant([[2.0], [3.0]]) b = tf.constant(4.0) return inner_function(x, y, b) # Note that the callable will create a graph that # includes `inner_function` as well as `outer_function`. outer_function(tf.constant([[1.0, 2.0]])).numpy()

如果您使用过 TensorFlow 1.x,会发现根本不需要定义 Placeholdertf.Sesssion

将 Python 函数转换为计算图

您使用 TensorFlow 编写的任何函数都将包含内置 TF 运算和 Python 逻辑的混合,例如 if-then 子句、循环、breakreturncontinue 等。虽然 TensorFlow 运算很容易被 tf.Graph 捕获,但特定于 Python 的逻辑需要经过额外的步骤才能成为计算图的一部分。tf.function 使用称为 AutoGraph (tf.autograph) 的库将 Python 代码转换为计算图生成代码。

def simple_relu(x): if tf.greater(x, 0): return x else: return 0 # `tf_simple_relu` is a TensorFlow `Function` that wraps `simple_relu`. tf_simple_relu = tf.function(simple_relu) print("First branch, with graph:", tf_simple_relu(tf.constant(1)).numpy()) print("Second branch, with graph:", tf_simple_relu(tf.constant(-1)).numpy())

虽然您不太可能需要直接查看计算图,但您可以检查输出以验证确切的结果。这些结果都不太容易阅读,因此不需要看得太仔细!

# This is the graph-generating output of AutoGraph. print(tf.autograph.to_code(simple_relu))
# This is the graph itself. print(tf_simple_relu.get_concrete_function(tf.constant(1)).graph.as_graph_def())

大多数情况下,tf.function 无需特殊考虑即可工作。但是,有一些注意事项,tf.function 指南以及完整的 AutoGraph 参考可以提供帮助。

多态性:一个 Function,多个计算图

tf.Graph 专门用于特定类型的输入(例如,具有特定 dtype 的张量或具有相同 id() 的对象)。

每次使用一组无法由现有的任何计算图处理的参数(例如具有新 dtypes 或不兼容形状的参数)调用 Function 时,Function 都会创建一个专门用于这些新参数的新 tf.Graphtf.Graph 输入的类型规范被称为它的输入签名签名。如需详细了解何时生成新的 tf.Graph 以及如何控制它,请转到使用 tf.function 提高性能指南的回溯规则部分。

FunctionConcreteFunction 中存储与该签名对应的 tf.GraphConcreteFunction 是围绕 tf.Graph 的封装容器

@tf.function def my_relu(x): return tf.maximum(0., x) # `my_relu` creates new graphs as it observes more signatures. print(my_relu(tf.constant(5.5))) print(my_relu([1, -1])) print(my_relu(tf.constant([3., -3.])))

如果已经使用该签名调用了 Function,则该 Function 不会创建新的 tf.Graph

# These two calls do *not* create new graphs. print(my_relu(tf.constant(-2.5))) # Signature matches `tf.constant(5.5)`. print(my_relu(tf.constant([-1., 1.]))) # Signature matches `tf.constant([3., -3.])`.

由于它由多个计算图提供支持,因此 Function多态的。这样,它便能够支持比单个 tf.Graph 可以表示的更多的输入类型,并优化每个 tf.Graph 来获得更出色的性能。

# There are three `ConcreteFunction`s (one for each graph) in `my_relu`. # The `ConcreteFunction` also knows the return type and shape! print(my_relu.pretty_printed_concrete_signatures())

使用 tf.function

到目前为止,您已经学习了如何使用 tf.function 作为装饰器或包装容器将 Python 函数简单地转换为计算图。但在实践中,让 tf.function 正常工作可能相当棘手!在下面的部分中,您将了解如何使用 tf.function 使代码按预期工作。

计算图执行与 Eager Execution

Function 函数中的代码既能以 Eager 模式执行,也可以作为计算图执行。默认情况下,Function 将其代码作为计算图执行:

@tf.function def get_MSE(y_true, y_pred): sq_diff = tf.pow(y_true - y_pred, 2) return tf.reduce_mean(sq_diff)
y_true = tf.random.uniform([5], maxval=10, dtype=tf.int32) y_pred = tf.random.uniform([5], maxval=10, dtype=tf.int32) print(y_true) print(y_pred)
get_MSE(y_true, y_pred)

要验证 Function 计算图是否与其等效 Python 函数执行相同的计算,您可以使用 tf.config.run_functions_eagerly(True) 使其以 Eager 模式执行。这是一个开关,用于关闭 Function 创建和运行计算图的能力,无需正常执行代码。

tf.config.run_functions_eagerly(True)
get_MSE(y_true, y_pred)
# Don't forget to set it back when you are done. tf.config.run_functions_eagerly(False)

但是,Function 在计算图执行和 Eager Execution 下的行为可能有所不同。Python print 函数是这两种模式不同之处的一个示例。我们看看当您将 print 语句插入到您的函数并重复调用它时会发生什么。

@tf.function def get_MSE(y_true, y_pred): print("Calculating MSE!") sq_diff = tf.pow(y_true - y_pred, 2) return tf.reduce_mean(sq_diff)

观察打印的内容:

error = get_MSE(y_true, y_pred) error = get_MSE(y_true, y_pred) error = get_MSE(y_true, y_pred)

输出很令人惊讶?尽管 get_MSE 被调用了 3 次,但它只打印了一次。

解释一下,print 语句在 Function 运行原始代码时执行,以便在称为“跟踪”(请参阅 tf.function 指南跟踪部分)的过程中创建计算图。跟踪将 TensorFlow 运算捕获到计算图中,而计算图中未捕获 print。随后对全部三个调用执行该计算图,而没有再次运行 Python 代码

作为健全性检查,我们关闭计算图执行来比较:

# Now, globally set everything to run eagerly to force eager execution. tf.config.run_functions_eagerly(True)
# Observe what is printed below. error = get_MSE(y_true, y_pred) error = get_MSE(y_true, y_pred) error = get_MSE(y_true, y_pred)
tf.config.run_functions_eagerly(False)

printPython 的副作用,在将函数转换为 Function 时,您还应注意其他差异。请在使用 tf.function 提升性能指南中的限制部分中了解详情。

注:如果您想同时在 Eager Execution 和计算图执行中打印值,请改用 tf.print

非严格执行

计算图执行仅执行产生可观察效果所需的运算,这包括:

  • 函数的返回值

  • 已记录的著名副作用,例如:

    • 输入/输出运算,如 tf.print

    • 调试运算,如 tf.debugging 中的断言函数

    • tf.Variable 的突变

这种行为通常称为“非严格执行”,与 Eager Execution 不同,后者会分步执行所有程序运算,无论是否需要。

特别是,运行时错误检查不计为可观察效果。如果一个运算因为不必要而被跳过,它不会引发任何运行时错误。

在下面的示例中,计算图执行期间跳过了“不必要的”运算 tf.gather,因此不会像在 Eager Execution 中那样引发运行时错误 InvalidArgumentError。切勿依赖执行计算图时引发的错误。

def unused_return_eager(x): # Get index 1 will fail when `len(x) == 1` tf.gather(x, [1]) # unused return x try: print(unused_return_eager(tf.constant([0.0]))) except tf.errors.InvalidArgumentError as e: # All operations are run during eager execution so an error is raised. print(f'{type(e).__name__}: {e}')
@tf.function def unused_return_graph(x): tf.gather(x, [1]) # unused return x # Only needed operations are run during graph execution. The error is not raised. print(unused_return_graph(tf.constant([0.0])))

tf.function 最佳做法

可能需要花一些时间来习惯 Function 的行为。为了快速上手,初次使用的用户应当使用 @tf.function 来装饰简单函数,以获得从 Eager Execution 转换到计算图执行的经验。

tf.function 设计可能是您编写与计算图兼容的 TensorFlow 程序的最佳选择。以下是一些提示:

  • 尽早并经常使用 tf.config.run_functions_eagerly 在 Eager Execution 和计算图执行之间切换,以查明两种模式是否/何时出现分歧。

  • 在 Python 函数外部创建 tf.Variable 并在内部修改它们。对使用 tf.Variable 的对象也如此操作,例如 tf.keras.layerstf.keras.Modeltf.keras.optimizers

  • 避免编写依赖于外部 Python 变量的函数,不包括 tf.Variable 和 Keras 对象。请在 tf.function 指南依赖于 Python 全局变量和自由变量中了解详情。

  • 尽可能编写以张量和其他 TensorFlow 类型作为输入的函数。您可以传入其他对象类型,但务必小心!请在 tf.function 指南依赖于 Python 对象中了解详情。

  • tf.function 下包含尽可能多的计算以最大程度提高性能收益。例如,装饰整个训练步骤或整个训练循环。

见证加速

tf.function 通常可以提高代码的性能,但加速的程度取决于您运行的计算种类。小型计算可能以调用计算图的开销为主。您可以按如下方式衡量性能上的差异:

x = tf.random.uniform(shape=[10, 10], minval=-1, maxval=2, dtype=tf.dtypes.int32) def power(x, y): result = tf.eye(10, dtype=tf.dtypes.int32) for _ in range(y): result = tf.matmul(x, result) return result
print("Eager execution:", timeit.timeit(lambda: power(x, 100), number=1000), "seconds")
power_as_graph = tf.function(power) print("Graph execution:", timeit.timeit(lambda: power_as_graph(x, 100), number=1000), "seconds")

tf.function 通常用于加速训练循环,您可以在使用 Keras 从头开始编写训练循环指南的使用 tf.function 加速训练步骤部分中了解详情。

注:您也可以尝试 tf.function(jit_compile=True) 以获得更显著的性能提升,特别是当您的代码非常依赖于 TF 控制流并且使用许多小张量时。请在 XLA 概述使用 tf.function(jit_compile=True) 显式编译部分中了解详情。

性能和权衡

计算图可以加速您的代码,但创建它们的过程有一些开销。对于某些函数,计算图的创建比计算图的执行花费更长的时间。这种投资通常会随着后续执行的性能提升而迅速得到回报,但重要的是要注意,由于跟踪的原因,任何大型模型训练的前几步可能会较慢。

无论您的模型有多大,您都应该避免频繁跟踪。tf.function 指南控制重新跟踪部分探讨了如何设置输入规范并使用张量参数来避免重新跟踪。如果您发现自己的性能异常糟糕,最好检查一下是否发生了意外重新跟踪。

Function 何时进行跟踪?

要确定您的 Function 何时进行跟踪,请在其代码中添加一条 print 语句。根据经验,Function 将在每次跟踪时执行该 print 语句。

@tf.function def a_function_with_python_side_effect(x): print("Tracing!") # An eager-only side effect. return x * x + tf.constant(2) # This is traced the first time. print(a_function_with_python_side_effect(tf.constant(2))) # The second time through, you won't see the side effect. print(a_function_with_python_side_effect(tf.constant(3)))
# This retraces each time the Python argument changes, # as a Python argument could be an epoch count or other # hyperparameter. print(a_function_with_python_side_effect(2)) print(a_function_with_python_side_effect(3))

新的 Python 参数总是会触发新计算图的创建,因此需要额外的跟踪。

后续步骤

您可以在 API 参考页面上详细了解 tf.function,并遵循使用 tf.function 提升性能指南。