Book a Demo!
CoCalc Logo Icon
StoreFeaturesDocsShareSupportNewsAboutPoliciesSign UpSign In
tensorflow
GitHub Repository: tensorflow/docs-l10n
Path: blob/master/site/zh-cn/tutorials/load_data/video.ipynb
25118 views
Kernel: Python 3
#@title Licensed under the Apache License, Version 2.0 (the "License"); # you may not use this file except in compliance with the License. # You may obtain a copy of the License at # # https://www.apache.org/licenses/LICENSE-2.0 # # Unless required by applicable law or agreed to in writing, software # distributed under the License is distributed on an "AS IS" BASIS, # WITHOUT WARRANTIES OR CONDITIONS OF ANY KIND, either express or implied. # See the License for the specific language governing permissions and # limitations under the License.

加载视频数据

本教程演示如何使用 UCF101 人体动作数据集加载和预处理 AVI 视频数据。当您对数据进行预处理后,就可以将其用于视频分类/识别、字幕或聚类等任务。原始数据集包含从 YouTube 收集的具有 101 个类别的真实动作视频,包括演奏大提琴、刷牙和化眼妆。您将学习如何:

  • 从 ZIP 文件加载数据。

  • 从视频文件中读取帧序列。

  • 呈现视频数据。

  • 封装帧生成器 tf.data.Dataset

本视频加载和预处理教程是 TensorFlow 视频教程系列的第一部分。下面是其他三个教程:

安装

首先,安装和导入一些必要的库,包括:用于检查 ZIP 文件内容的 remotezip,用于使用进度条的 tqdm,用于处理视频文件的 OpenCV,以及用于在 Jupyter 笔记本中嵌入数据的 tensorflow_docs

# The way this tutorial uses the `TimeDistributed` layer requires TF>=2.10 !pip install -U "tensorflow>=2.10.0"
!pip install remotezip tqdm opencv-python !pip install -q git+https://github.com/tensorflow/docs
import tqdm import random import pathlib import itertools import collections import os import cv2 import numpy as np import remotezip as rz import tensorflow as tf # Some modules to display an animation using imageio. import imageio from IPython import display from urllib import request from tensorflow_docs.vis import embed

下载 UCF101 数据集的子集

UCF101 数据集包含 101 类不同动作的视频,主要用于动作识别。您将在此演示中使用这些类别的一个子集。

URL = 'https://storage.googleapis.com/thumos14_files/UCF101_videos.zip'

上面的网址包含一个带有 UCF 101 数据集的 ZIP 文件。创建一个使用 remotezip 库的函数来检查该 URL 中 ZIP 文件的内容:

def list_files_from_zip_url(zip_url): """ List the files in each class of the dataset given a URL with the zip file. Args: zip_url: A URL from which the files can be extracted from. Returns: List of files in each of the classes. """ files = [] with rz.RemoteZip(zip_url) as zip: for zip_info in zip.infolist(): files.append(zip_info.filename) return files
files = list_files_from_zip_url(URL) files = [f for f in files if f.endswith('.avi')] files[:10]

先从几个视频和有限数量的类开始训练。运行上述代码块后,请注意类名包含在每个视频的文件名中。

定义从文件名中检索类名的 get_class 函数。然后,创建一个名为 get_files_per_class 的函数,它会将所有文件的列表(上面的 files)转换为列出每个类的文件的字典:

def get_class(fname): """ Retrieve the name of the class given a filename. Args: fname: Name of the file in the UCF101 dataset. Returns: Class that the file belongs to. """ return fname.split('_')[-3]
def get_files_per_class(files): """ Retrieve the files that belong to each class. Args: files: List of files in the dataset. Returns: Dictionary of class names (key) and files (values). """ files_for_class = collections.defaultdict(list) for fname in files: class_name = get_class(fname) files_for_class[class_name].append(fname) return files_for_class

获得每个类的文件列表后,您可以选择要使用多少个类,以及每个类需要多少视频,以创建数据集。

NUM_CLASSES = 10 FILES_PER_CLASS = 50
files_for_class = get_files_per_class(files) classes = list(files_for_class.keys())
print('Num classes:', len(classes)) print('Num videos for class[0]:', len(files_for_class[classes[0]]))

创建一个名为 select_subset_of_classes 的新函数,它会选择数据集中存在的类的子集并在每个类中选择特定数量的文件:

def select_subset_of_classes(files_for_class, classes, files_per_class): """ Create a dictionary with the class name and a subset of the files in that class. Args: files_for_class: Dictionary of class names (key) and files (values). classes: List of classes. files_per_class: Number of files per class of interest. Returns: Dictionary with class as key and list of specified number of video files in that class. """ files_subset = dict() for class_name in classes: class_files = files_for_class[class_name] files_subset[class_name] = class_files[:files_per_class] return files_subset
files_subset = select_subset_of_classes(files_for_class, classes[:NUM_CLASSES], FILES_PER_CLASS) list(files_subset.keys())

定义将视频拆分为训练集、验证集和测试集的辅助函数。视频从带有 ZIP 文件的网址下载,并放置在各自的子目录中。

def download_from_zip(zip_url, to_dir, file_names): """ Download the contents of the zip file from the zip URL. Args: zip_url: A URL with a zip file containing data. to_dir: A directory to download data to. file_names: Names of files to download. """ with rz.RemoteZip(zip_url) as zip: for fn in tqdm.tqdm(file_names): class_name = get_class(fn) zip.extract(fn, str(to_dir / class_name)) unzipped_file = to_dir / class_name / fn fn = pathlib.Path(fn).parts[-1] output_file = to_dir / class_name / fn unzipped_file.rename(output_file)

以下函数会返回尚未放入数据子集的剩余数据。它允许您将剩余的数据放在下一个指定的数据子集中。

def split_class_lists(files_for_class, count): """ Returns the list of files belonging to a subset of data as well as the remainder of files that need to be downloaded. Args: files_for_class: Files belonging to a particular class of data. count: Number of files to download. Returns: Files belonging to the subset of data and dictionary of the remainder of files that need to be downloaded. """ split_files = [] remainder = {} for cls in files_for_class: split_files.extend(files_for_class[cls][:count]) remainder[cls] = files_for_class[cls][count:] return split_files, remainder

下面的 download_ufc_101_subset 函数允许您下载 UCF101 数据集的子集并将其拆分为训练集、验证集和测试集。您可以指定要使用的类的数量。splits 参数允许您传入一个字典,其中键值是子集的名称(例如:“train”)和您希望每个类拥有的视频数量。

def download_ucf_101_subset(zip_url, num_classes, splits, download_dir): """ Download a subset of the UCF101 dataset and split them into various parts, such as training, validation, and test. Args: zip_url: A URL with a ZIP file with the data. num_classes: Number of labels. splits: Dictionary specifying the training, validation, test, etc. (key) division of data (value is number of files per split). download_dir: Directory to download data to. Return: Mapping of the directories containing the subsections of data. """ files = list_files_from_zip_url(zip_url) for f in files: path = os.path.normpath(f) tokens = path.split(os.sep) if len(tokens) <= 2: files.remove(f) # Remove that item from the list if it does not have a filename files_for_class = get_files_per_class(files) classes = list(files_for_class.keys())[:num_classes] for cls in classes: random.shuffle(files_for_class[cls]) # Only use the number of classes you want in the dictionary files_for_class = {x: files_for_class[x] for x in classes} dirs = {} for split_name, split_count in splits.items(): print(split_name, ":") split_dir = download_dir / split_name split_files, files_for_class = split_class_lists(files_for_class, split_count) download_from_zip(zip_url, split_dir, split_files) dirs[split_name] = split_dir return dirs
download_dir = pathlib.Path('./UCF101_subset/') subset_paths = download_ucf_101_subset(URL, num_classes = NUM_CLASSES, splits = {"train": 30, "val": 10, "test": 10}, download_dir = download_dir)

下载数据后,您现在应该拥有了一个 UCF101 数据集子集的副本。运行以下代码即可打印您在所有数据子集中拥有的视频总数。

video_count_train = len(list(download_dir.glob('train/*/*.avi'))) video_count_val = len(list(download_dir.glob('val/*/*.avi'))) video_count_test = len(list(download_dir.glob('test/*/*.avi'))) video_total = video_count_train + video_count_val + video_count_test print(f"Total videos: {video_total}")

您现在还可以预览数据文件的目录。

!find ./UCF101_subset

从每个视频文件创建帧

frames_from_video_file 函数会将视频拆分为帧,从视频文件中读取随机选择的 n_frames 跨度,并将它们作为 NumPy array 返回。要减少内存和计算开销,请选择少量帧。此外,请从每个视频中选取相同数量的帧,这样可以更轻松地处理批量数据。

def format_frames(frame, output_size): """ Pad and resize an image from a video. Args: frame: Image that needs to resized and padded. output_size: Pixel size of the output frame image. Return: Formatted frame with padding of specified output size. """ frame = tf.image.convert_image_dtype(frame, tf.float32) frame = tf.image.resize_with_pad(frame, *output_size) return frame
def frames_from_video_file(video_path, n_frames, output_size = (224,224), frame_step = 15): """ Creates frames from each video file present for each category. Args: video_path: File path to the video. n_frames: Number of frames to be created per video file. output_size: Pixel size of the output frame image. Return: An NumPy array of frames in the shape of (n_frames, height, width, channels). """ # Read each video frame by frame result = [] src = cv2.VideoCapture(str(video_path)) video_length = src.get(cv2.CAP_PROP_FRAME_COUNT) need_length = 1 + (n_frames - 1) * frame_step if need_length > video_length: start = 0 else: max_start = video_length - need_length start = random.randint(0, max_start + 1) src.set(cv2.CAP_PROP_POS_FRAMES, start) # ret is a boolean indicating whether read was successful, frame is the image itself ret, frame = src.read() result.append(format_frames(frame, output_size)) for _ in range(n_frames - 1): for _ in range(frame_step): ret, frame = src.read() if ret: frame = format_frames(frame, output_size) result.append(frame) else: result.append(np.zeros_like(result[0])) src.release() result = np.array(result)[..., [2, 1, 0]] return result

呈现视频数据

frames_from_video_file 函数会将一组帧作为 NumPy 数组返回。尝试在 Patrick Gillett 的 Wikimedia{:.external} 的新视频中使用此函数:

!curl -O https://upload.wikimedia.org/wikipedia/commons/8/86/End_of_a_jam.ogv
video_path = "End_of_a_jam.ogv"
sample_video = frames_from_video_file(video_path, n_frames = 10) sample_video.shape
def to_gif(images): converted_images = np.clip(images * 255, 0, 255).astype(np.uint8) imageio.mimsave('./animation.gif', converted_images, fps=10) return embed.embed_file('./animation.gif')
to_gif(sample_video)

除了查看此视频外,您还可以显示 UCF-101 数据。为此,请运行以下代码:

# docs-infra: no-execute ucf_sample_video = frames_from_video_file(next(subset_paths['train'].glob('*/*.avi')), 50) to_gif(ucf_sample_video)

接下来,定义 FrameGenerator 类以创建一个可迭代对象,该对象可以将数据输入 TensorFlow 数据流水线。生成器 (__call__) 函数产生由 frames_from_video_file 生成的帧数组以及与帧集相关联的标签的独热编码向量。

class FrameGenerator: def __init__(self, path, n_frames, training = False): """ Returns a set of frames with their associated label. Args: path: Video file paths. n_frames: Number of frames. training: Boolean to determine if training dataset is being created. """ self.path = path self.n_frames = n_frames self.training = training self.class_names = sorted(set(p.name for p in self.path.iterdir() if p.is_dir())) self.class_ids_for_name = dict((name, idx) for idx, name in enumerate(self.class_names)) def get_files_and_class_names(self): video_paths = list(self.path.glob('*/*.avi')) classes = [p.parent.name for p in video_paths] return video_paths, classes def __call__(self): video_paths, classes = self.get_files_and_class_names() pairs = list(zip(video_paths, classes)) if self.training: random.shuffle(pairs) for path, name in pairs: video_frames = frames_from_video_file(path, self.n_frames) label = self.class_ids_for_name[name] # Encode labels yield video_frames, label

在将 FrameGenerator 对象封装为 TensorFlow Dataset 对象之前对其进行测试。此外,对于训练数据集,请确保启用训练模式,以便对数据进行重排。

fg = FrameGenerator(subset_paths['train'], 10, training=True) frames, label = next(fg()) print(f"Shape: {frames.shape}") print(f"Label: {label}")

最后,创建一个 TensorFlow 数据输入流水线。您从生成器对象创建的此流水线允许您将数据输入深度学习模型。在此视频流水线中,每个元素都是一组单独的帧及其关联标签。

# Create the training set output_signature = (tf.TensorSpec(shape = (None, None, None, 3), dtype = tf.float32), tf.TensorSpec(shape = (), dtype = tf.int16)) train_ds = tf.data.Dataset.from_generator(FrameGenerator(subset_paths['train'], 10, training=True), output_signature = output_signature)

检查标签是否重排。

for frames, labels in train_ds.take(10): print(labels)
# Create the validation set val_ds = tf.data.Dataset.from_generator(FrameGenerator(subset_paths['val'], 10), output_signature = output_signature)
# Print the shapes of the data train_frames, train_labels = next(iter(train_ds)) print(f'Shape of training set of frames: {train_frames.shape}') print(f'Shape of training labels: {train_labels.shape}') val_frames, val_labels = next(iter(val_ds)) print(f'Shape of validation set of frames: {val_frames.shape}') print(f'Shape of validation labels: {val_labels.shape}')

配置数据集以提高性能

使用缓冲预提取,以便从磁盘产生数据,而不会阻塞 I/O。下面是可以在加载数据时使用的两个重要函数:

  • Dataset.cache:在第一个周期期间从磁盘加载图像后,它会将这些图像保留在内存中。该函数确保在训练模型时数据集不会成为瓶颈。如果数据集太大无法装入内存,您也可以使用此方法创建高性能的磁盘缓存。

  • Dataset.prefetch:在训练时重叠数据预处理和模型执行。有关详细信息,请参阅使用 tf.data 提升性能

AUTOTUNE = tf.data.AUTOTUNE train_ds = train_ds.cache().shuffle(1000).prefetch(buffer_size = AUTOTUNE) val_ds = val_ds.cache().shuffle(1000).prefetch(buffer_size = AUTOTUNE)

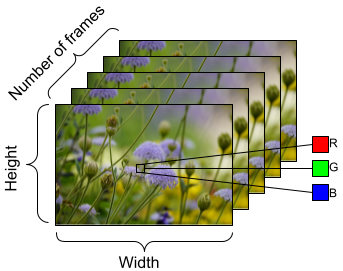
要准备馈送到模型的数据,请使用批处理,如下所示。请注意,在处理视频数据(例如 AVI 文件)时,数据应形成五维对象。这些维度如下:[batch_size, number_of_frames, height, width, channels]。相比之下,图像将具有四个维度:[batch_size, height, width, channels]。下图说明了如何表示视频数据的形状。

视频数据形状

train_ds = train_ds.batch(2) val_ds = val_ds.batch(2) train_frames, train_labels = next(iter(train_ds)) print(f'Shape of training set of frames: {train_frames.shape}') print(f'Shape of training labels: {train_labels.shape}') val_frames, val_labels = next(iter(val_ds)) print(f'Shape of validation set of frames: {val_frames.shape}') print(f'Shape of validation labels: {val_labels.shape}')

后续步骤

现在,您已经创建了带有标签的视频帧的 TensorFlow Dataset,您可以将其与深度学习模型一起使用。以下使用预训练的 EfficientNet{:.external} 的分类模型可在几分钟内训练到较高准确率:

net = tf.keras.applications.EfficientNetB0(include_top = False) net.trainable = False model = tf.keras.Sequential([ tf.keras.layers.Rescaling(scale=255), tf.keras.layers.TimeDistributed(net), tf.keras.layers.Dense(10), tf.keras.layers.GlobalAveragePooling3D() ]) model.compile(optimizer = 'adam', loss=tf.keras.losses.SparseCategoricalCrossentropy(from_logits = True), metrics=['accuracy']) model.fit(train_ds, epochs = 10, validation_data = val_ds, callbacks = tf.keras.callbacks.EarlyStopping(patience = 2, monitor = 'val_loss'))

要详细了解如何在 TensorFlow 中处理视频数据,请查看以下教程: